


When a new user account is established in Windows, a default profile picture is automatically assigned. This guide will demonstrate how to alter the default user account image in Windows, allowing you to select any preferred photo. Additionally, you can regulate the default user icon and prevent users from making changes to it.
Modify Your Account Image in Windows
Windows users have several options to update their default account images, which can be done using the Settings app, the user accounts picture folder, or the online Microsoft account dashboard.
To find your profile images, navigate to Settings -> Accounts -> Account settings -> Your info.

In the Adjust your photo section, you have the option to replace the default user image with one of your choice by either clicking on Open Camera for a new photo or Browse files to select an existing image.
The updated image will instantly appear on the account page.

Previously, account image changes could also be done via the Control Panel, but this feature has since been discontinued.
Changing Images from the User Accounts Picture Folder
Windows retains the default account images in PNG format in a specific system folder, with various sizes available. By substituting these default images with your chosen icon, you can effectively change the default account picture.
To begin, open File Explorer and navigate to the folder: %ProgramData%\Microsoft\User Account Pictures. Within this directory, you will find all the standard user account icons, which need to be replaced with your profile images of equivalent dimensions.

Begin by downloading an image or icon of your choice, ensuring it has a minimum resolution of 512px x 512px, with equal width and height. Create five duplicates of this icon and resize them to the required dimensions, which can be done conveniently using MS Paint.
- 448 x 448 – user.png
- 192 x 192 – user-192.png
- 48 x 48 – user-48.png
- 40 x 40 – user-40.png
- 32 x 32 – user-32.png
Next, copy the resized images into the User Account Pictures folder, selecting Replace the file in the destination to apply your new selections. This action will overwrite the previous files, so backing them up is highly recommended.
Store the backup files in a convenient folder for future access, or you can append the. BKP extension for them. Rename the files to “user.png.bkp,” “user-192.png.bkp,” “user-48.png.bkp,” “user-40.png.bkp,” and “user-32.png.bkp,” while leaving “user.bmp” untouched.
Changing Pictures via the Microsoft Account Dashboard
By default, a picture associated with your Microsoft account will sync to your Windows device. This is also applicable to users with a Microsoft 365 subscription or those who have OneDrive or SharePoint synced on their computer.
Access your Microsoft account online. Once logged in, head to Your info. There, you can click on Change Photo to update the profile image linked to your Microsoft account.

A pop-up will appear allowing you to browse your computer for the new image to associate with your profile. After adding your new photo, click Save to confirm your choice. Follow this up by selecting Update your Profile to finalize the changes to your Microsoft account.
Removing a Windows User Account Picture
To delete a Windows user account picture, you can do so from either the AppData folder or via the Microsoft account dashboard.
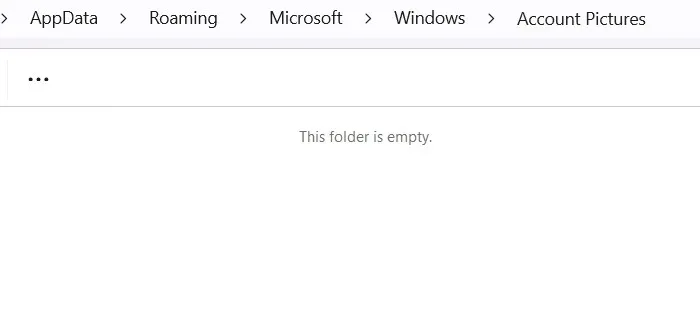
In File Explorer, type %AppData% into the address bar and navigate to the Microsoft folder. Alternatively, you can get there through This PC by tracing the path through the administrator user to the Roaming folder.

Once located, head to the Windows -> Account Pictures directory, where you can remove any images no longer in use. If the folder appears empty, as it does on my PC, that suggests the images are being synchronized via Microsoft cloud services, leading us to the next method for deletion.
Return to your Microsoft account online and click on Your info, then select Change Photo. The current profile picture will be visible on your Windows device. Hit Remove Photo, and a prompt will ask if you are sure about the deletion. Confirm by selecting Yes.

Reverting to the Default Account Picture
If you wish to restore the default Microsoft account picture, make adjustments in both the Settings app and the default User Account Pictures folder. First, go to Settings -> Accounts -> Account settings -> Your info.
Upload the original default image using Browse files. This requires navigating to the %ProgramData% folder, then proceeding to the User Account Pictures directory. Here, you can pick any guest or user image in PNG format (avoid the BMP format). These images represent the default wireframe account pictures assigned to your device.

Restoring your account picture to the default will also refresh it in your Microsoft account, which is useful for those preferring not to showcase their actual photos online.
Restricting Users From Modifying the Account Picture
If you aim to prevent users from changing the account picture (which could be a common trick played on Windows users), you have two methods to accomplish it: utilizing the Local Group Policy Editor or the Registry Editor.
Open the Start menu, search for “gpedit.msc,” right-click on it, and choose the Run as administrator option.
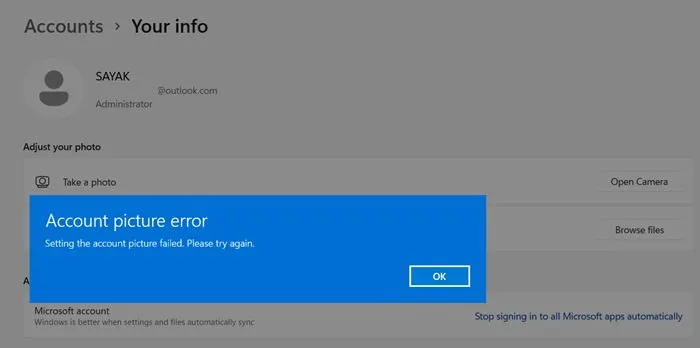
Within the Group Policy Editor, follow this path: Computer Configuration -> Administrative Templates -> Control Panel -> User Accounts. In the right panel, double-click on the Apply the default account picture to all users policy to bring up a new properties window.
Select Enabled within the policy properties window, and confirm by clicking OK to save your changes.
After restarting your system, no users will have the ability to modify the default account picture. Instead, they will encounter an Account picture error when attempting to alter the UAC image from settings.
To revert this change, simply select either Disabled or Not configured in the policy properties window.
If the Group Policy Editor is unavailable to you, the Registry Editor can be utilized instead. Search for “regedit” in the Start menu, right-click it, and select Run as administrator.
Navigate to the following location in the Registry Editor:
In the right panel, perform a right-click to select “New -> DWORD (32-bit) Value.” Name this new entry as UseDefaultTile. Double-click this value, set the Value Data to “1,” and press OK.

To revert back, change the value data to “0” or delete the UseDefaultTile value entirely. Always remember to back up the Windows registry before and after making any alterations.
This guide has provided a comprehensive overview of the various methods available to modify the User Account Control (UAC) picture in Windows.
Image Credit: Pixabay. All screenshots by Sayak Boral.